I. Introduction
With the increasing frequency of power outages due to extreme weather conditions, having a reliable backup power system has become more of a necessity than a convenience. Traditional fossil fuel generators, while effective in emergencies, come with several drawbacks, including high fuel consumption, noise, and harmful emissions. They are also not environmentally friendly, contributing to global pollution.
An alternative to these traditional generators is a home battery backup system, which offers a more sustainable and quieter solution. These systems can provide power during blackouts without the need for fossil fuels. Furthermore, they are often paired with renewable energy sources such as solar panels, allowing for a clean, off-grid energy solution.
If you enjoy DIY projects, building your own home battery backup system can be a rewarding and cost-effective way to ensure energy independence during emergencies. Alternatively, plug-and-play portable power stations are readily available and easy to install, making them a great option for those who prefer simplicity over a hands-on approach.
II. Key Components Required for a DIY Energy Storage System
To create an efficient and functional DIY energy storage system, you will need several key components that ensure compatibility and reliability. These components include the following:
Power Inverter
Importance of converting DC to AC: Batteries produce direct current (DC) electricity, while most home appliances require alternating current (AC). To make your backup system compatible with household appliances, a power inverter is necessary to convert the DC from the batteries into usable AC power.
Determining power output requirements: The inverter’s power output is measured in watts. To select the appropriate inverter, you first need to calculate the power consumption of the appliances you intend to run during a blackout. This will allow you to choose an inverter with sufficient wattage to meet those demands.
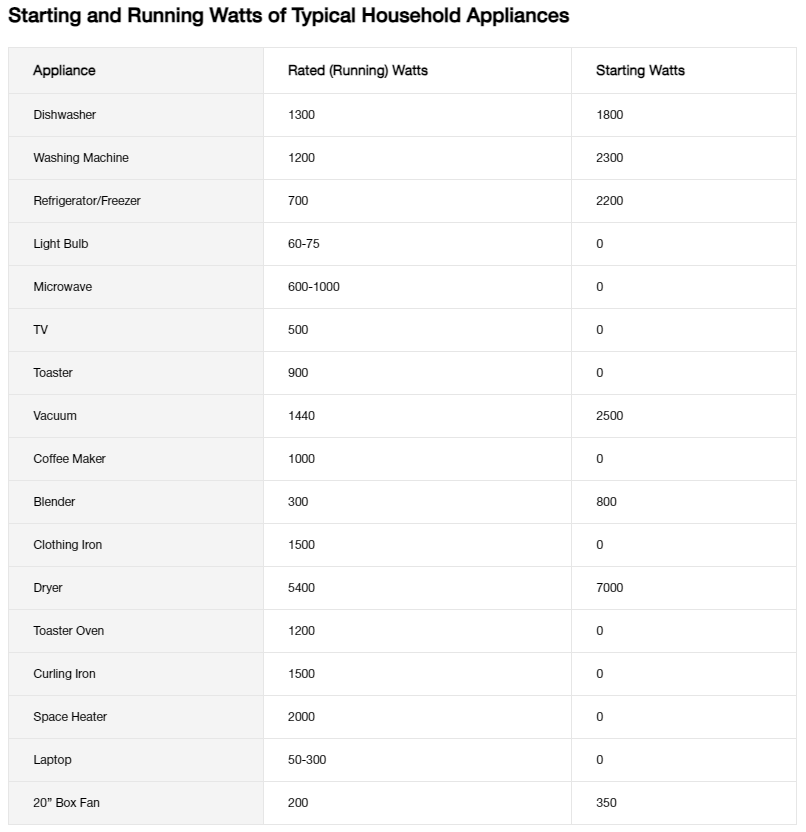
Calculating wattage for appliances: You’ll need to sum the wattage of each appliance you want to power. For example, if you plan to power a refrigerator, a microwave, and lights, add their individual wattages together to determine the total demand.
Surge power considerations: Many appliances, such as refrigerators and air conditioners, require additional power to start. This is referred to as surge power or starting watts. Make sure your inverter can handle both the running and starting wattages of the devices.

Home Backup Battery
Selection of battery based on wattage and usage duration: Batteries come in various sizes, measured in watt-hours (Wh) or kilowatt-hours (kWh). To choose the right battery, you need to know how long you want to power your devices and their total wattage. Multiply the wattage of each device by the time it will be running to estimate the required battery capacity.
Example battery capacities and usage scenarios: Small batteries may have capacities as low as 100Wh, suitable for charging laptops or phones. Larger systems, such as a 3.6kWh battery, can power essential household appliances like refrigerators and heaters during an extended blackout.
Importance of choosing the right battery chemistry: The efficiency and lifespan of a battery depend heavily on its chemistry. Lithium Iron Phosphate (LiFePO4) batteries are considered the most efficient and long-lasting, followed by lithium-ion batteries. Lead-acid batteries are cheaper but have shorter lifespans and lower efficiency. Consider the long-term value when selecting your battery chemistry.
Battery Charger
Role of charger and regulator in maintaining battery efficiency: A battery charger is essential for keeping your backup system operational. The charger ensures that your batteries are always ready by regulating their charge and preventing overcharging, which could damage the battery.
Importance of solar panel compatibility for off-grid power systems: If you plan to integrate solar panels into your system, it’s crucial to ensure that your charger is compatible with your chosen panels and battery. This will allow your system to recharge during daylight hours, even if the grid is down.
Wiring and Cables
Proper connection of system components: When assembling a DIY energy storage system, you need to ensure that all components are properly connected with compatible wiring and cables. This includes linking the battery to the inverter and charger and connecting your system to the home’s electrical panel.
Use of transfer switches for integrating with home wiring: For safety and convenience, it’s essential to use a transfer switch. This device safely connects your battery backup system to your home’s electrical system, ensuring that power is switched from the grid to the battery during a blackout without backfeeding electricity, which could be dangerous.
III. Steps to Build a DIY Energy Storage System
To create an efficient and functional DIY energy storage system, follow these key steps to ensure all components work together harmoniously.
Step 1: Choose a Power Inverter
Your first step is selecting the appropriate power inverter. Since batteries produce direct current (DC), and most household appliances run on alternating current (AC), you’ll need an inverter to convert DC to AC.
Consider wattage requirements: Calculate the total wattage of all the devices you want to power during an outage. This will help you choose an inverter that meets your needs. For example, if you need to power a refrigerator (700W), a laptop (100W), and a few lights (60W each), you’d need an inverter that can handle at least 1,000-1,500 watts.
Account for surge power: Appliances like refrigerators or air conditioners often require a higher surge or starting wattage than their running wattage. Choose an inverter that can manage these surge demands, ensuring your appliances start without issues.
Step 2: Select the Right Battery Type and Size
Next, select a battery or set of batteries that can store sufficient energy for your needs.
Calculate battery capacity: To choose the right battery size, calculate how much power your devices will consume and how long you’ll need to run them. For example, running a 300W device for six hours will require at least a 1.8 kWh battery (300W x 6 hours = 1,800Wh or 1.8kWh).
Choose appropriate battery chemistry: The most common battery types include Lithium Iron Phosphate (LiFePO4), lithium-ion, Nickel Cadmium (Ni-Cad), and lead-acid batteries. For DIY systems, LiFePO4 is often preferred for its efficiency and long lifespan, though it is more expensive upfront. Lithium-ion batteries are also highly efficient and lightweight. Lead-acid batteries, while cheaper, have a shorter lifespan and lower efficiency.
Step 3: Install a Compatible Battery Charger
Once you have your inverter and battery, you’ll need a battery charger to keep your battery topped up. This component ensures that the battery remains fully charged and ready to power your home during an outage.
Choose the right charger: Ensure the charger you select is compatible with your battery chemistry. For example, LiFePO4 and lead-acid batteries require different charging voltages and profiles. Selecting the correct charger prevents battery damage from overcharging or improper charging cycles.
Solar panel compatibility: If you’re planning to incorporate solar panels into your system, ensure your charger works with them. This allows the system to recharge during the day, providing continuous backup power.
Step 4: Connect the System and Ensure Proper Wiring
Finally, you’ll need to wire the system together, ensuring all components—battery, inverter, charger, and transfer switch—are properly connected.
Connect the inverter and charger: Wire your battery to the inverter and ensure the battery charger is connected to regulate the battery’s charge. If using solar panels, connect them through a charge controller to prevent overcharging.
Install a transfer switch: A transfer switch ensures that during a power outage, your backup battery takes over seamlessly. This switch prevents backfeeding, which can be dangerous for utility workers. It’s highly recommended to hire a licensed electrician to install this component, as incorrect installation can result in electrical hazards.
IV. Common Mistakes to Avoid
When building your DIY energy storage system, there are several common mistakes that can affect performance or safety. Avoid these pitfalls for a smooth and reliable system.
Mistake #1: Choosing the Wrong Battery Chemistry
Selecting the appropriate battery chemistry is critical to the efficiency and lifespan of your system.
Lithium Iron Phosphate (LiFePO4): The most efficient and long-lasting option, capable of handling deep discharges and offering over a decade of service. It is more expensive but provides the best long-term value.
Lithium-Ion: Another high-efficiency battery that is lightweight and widely used in home systems. It’s slightly less durable than LiFePO4 but still offers good longevity.
Nickel Cadmium (Ni-Cad): While Ni-Cad batteries are known for their durability, they have lower energy efficiency and are not as widely used in modern energy storage systems.
Lead-Acid: The least efficient and with the shortest lifespan, lead-acid batteries are the most affordable option but need frequent replacement, which can raise long-term costs.
Mistake #2: Underestimating Energy Consumption
One of the biggest challenges in designing a home energy storage system is accurately estimating energy consumption.
Importance of accurate calculations: Calculate the wattage of all appliances you want to power and how long they will run. This will help you determine both the required inverter capacity and battery size.
Benefits of oversizing storage: Always aim to have at least 20% more storage capacity than your initial estimate. This buffer ensures you don’t deplete the battery too quickly, protecting its lifespan and providing extra power in case of unexpected needs.
Mistake #3: Attempting to Connect the System to Home Wiring Without a Professional
Wiring high-voltage systems can be dangerous if not handled properly. It is crucial to involve a licensed electrician when connecting your energy storage system to your home.
Safety risks: Incorrectly wiring your system can lead to electric shocks, fires, or damage to your home’s electrical system. Transfer switches must be installed correctly to prevent hazardous backfeeding of electricity into the grid.
Hiring a professional: A licensed electrician will ensure that your system meets safety standards and operates reliably. While DIYing much of the setup is possible, some tasks, like wiring the transfer switch, should always be left to professionals.
Final Thoughts
Your home is at risk of power outages at any time. A backup power supply is the best safeguard against energy vulnerability.
Dagong Huiyao has the products and the expertise you need to keep your appliances running and your lights on — even during an extended power outage.


